Few of us have time or money to spend hours upon hours pampering our cars. However, with the correct car-care solutions, dull, old paintwork may be transformed into a mirror-like professional gloss in a fraction of the time. This will help protect your panels against unwanted sun, environmental, and cosmetic damage, as well as maintain the beauty and value of your model.
You want your car to have showroom-fresh shine, and you want it to last. Here’s how to wax a car to make your panels sparkle with a durable protective finish.
Benefits of Waxing
Are you undecided about getting your car waxed? Perhaps you haven’t done any research on the subject or come across any helpful car waxing advice. Here are a few more facts to give you the push you need to properly appreciate the many advantages of car waxing.
- It’s Cheap – Wax is quite inexpensive when compared to other paint protection products, owing to its ease of production and available supplies
- High-Quality Sheen – Wax is preferred by many car owners because it can give a particularly shiny surface finish, despite its low durability. It blends in so perfectly with automotive paint that once it’s thoroughly polished, you won’t notice any differences. You can make the surface look so clean and preserve the wax unspoiled for a long time with good polishing
- Easy and Safe to Apply – Waxing a car is undoubtedly your best bet if you’re looking for a car paint protection treatment that doesn’t require any specific ability or equipment to apply. Only a foam applicator is required for application. This means you may learn basic automobile waxing techniques at home. Furthermore, no matter how much you apply to your car’s surface, it has no abrasive effect on the paint.
Must-Have Supplies For Car Waxing
It’s crucial to have everything you need for waxing within easy reach because it’s difficult to stop once you’ve started.
The following are the bare basics for waxing your car:
- Set aside an hour or two for waxing
- A working place that is cool, dry, and covered
- Water and a hose are both readily available
- A wash pail overflowing with car soap (dish soap works well, too)
- One or two soft, clean sponges
- Two applicator pads that are about the size of your hand
- A pair of chemical-resistant disposable gloves
- A chamois and/or a drying towel
- Shop towels/rags
- Depending on the size of your vehicle, two to four microfiber towels will suffice
- Removal of paint.
- One wax bottle for cars (either a liquid wax, spray wax, or paste wax).
Glass cleaner and/or tire and wheel cleaner are optional supplies. Both of these products can be used to help complete your vehicle’s overall clean appearance. They are not, however, essential for waxing your car.
Read more >> What Is Oil Sludging? How To Clean Sludge From Engine?
How To Wax A Car Properly?
Waxing your vehicle could be a basic preparation in terms of just putting wax on and taking it off. But nothing automotive-related is ever that simple, right? There are many steps you’ll have to take some time recently indeed applying the car wax on the off chance that you need the finest comes about and a stress-free time.
The more completely you’re able to get your vehicle’s paint, the better your last comes about will be. Let’s take a closer look at this pre-waxing process:
Step 1: Investing in a High-Quality Car Wax
There are two sorts of items you can utilize when waxing your car: carnauba-based car wax and paint sealant. Carnauba wax is made from the leaves of a Brazilian palm tree and gives a nice high-quality sparkle. Paint sealant could be a polymer-based wax that gives a longer enduring sparkle and additional assurance. You’ll be able to ordinarily discover both of these sorts of car waxes at your nearby huge box store or at most auto parts retailers. There are a few national brands of car wax to select from. Whereas there’s no need to splurge on car wax, it could be a great thought to select an item that’s within the center of the cost run. The most well-known form of car wax is bundled in a little tub, in spite of the fact that auto wax is additionally available in a splash and fluid frame.
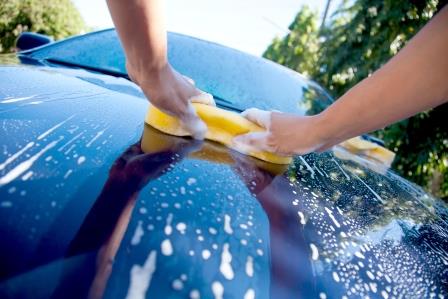
Step 2: Wash Your Car
Car wax should be applied to a clean, dry vehicle. Before applying wax, either take your car to a car wash or wash it yourself. It’s crucial to start with a clean car since any dirt or dust left on the surface will cause the paint’s clear layer to be scratched while applying the wax. Pay close attention to the door jambs, door handles, and the transition from the side of the automobile to the underbelly, as these are frequently overlooked. Before applying any wax, make sure your car is totally dry.
Step 3: Read the Car Wax Package’s Instructions
There may be different instructions on how to apply wax to your car depending on the brand and type of wax you’re using. Always read all of the instructions and package inserts that came with the wax. Following the product’s instructions will ensure that the wax is applied correctly and that you get the most out of your effort.
Step 4: Apply wax to the Pad
Open the packaging and remove the pad if you’re using car wax that comes in a tub. There should be another lid underneath the pad. This lid should disclose the wax when opened. Apply a small amount of liquid paint sealant directly to the waxing pad if using a liquid paint sealant. It’s crucial to start with a modest amount of wax paste or liquid paint sealant for both. The pad will become more saturated with the product as you continue to wax the vehicle, so you won’t need to apply as much wax at first.
Step 5: Choose an Area to Begin Waxing
It’s ideal to wax your vehicle in parts so you remember where you put the wax and the wax doesn’t remain on the car for too long and dries out. When you keep wax on your vehicle for an extended period of time, it becomes hard and difficult to remove. It won’t harm your car’s paint, but it will make wax removal extremely time-consuming and complicated. Start with one section of the car and work your way to the next. The front fender panel, which is positioned on both sides of the vehicle above the front wheels and extends to the front of the vehicle, is an excellent place to start. From here, you’d go around the vehicle, finishing each section until it was finished.
Step 6: Apply the Wax
Use a small, circular motion to apply the wax. Apply a small layer of wax to the area of the car that you are working on. To ensure that the entire area is covered, use either horizontal or vertical rows of circles. Avoid using too much wax because it isn’t necessary and can actually make removal more difficult. It’s best to use a thin layer of wax that allows you to see the paint color through the wax. After you’ve applied the wax to your vehicle, you’ll see that it starts to dry within a few minutes. When the wax is dry, it will have a matte appearance and a chalky sensation.
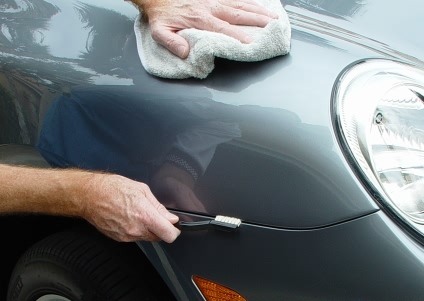
Step 7: Remove the Wax
Remove the wax from your car’s surface with a microfiber towel, chamois, or other soft cloth. To remove the majority of the wax, start by applying light pressure to the cloth and moving it in a circular motion. After the visible wax has been removed, buff the automobile in a quick circular motion to improve the gloss and luster. The surface of your car should be shiny and glossy after the wax has been removed.
Read more >> How To Change A Tire? A Guide For Flat Tire Changing
Tips for Waxing a Car
- If you’re concerned about wax getting on specific items, protect them with masking tape or plastic. Make sure the tape is sticky, but not excessively so; otherwise, it will be difficult to remove the tape from your vehicle.
- It is preferable to use more wax than to use too little. It will be more difficult to remove all of the wax from your vehicle if you apply too much, but don’t be afraid to be generous.
- Waxing a black car is more difficult. Black automobiles, like white ones, show all. There are waxes made specifically for black vehicles, so look for those if you need them.
- If this is your first time waxing a car, go to your local auto parts store and get the most basic wax. It should be something you feel comfortable applying, not necessarily the cheapest. Use this as a starting point for your wax. If you want to be more adventurous in the future, try a different brand.
- If you plan to sell your vehicle, car waxing is a great way to make it seem nice for pictures. It’s been said that we buy with our eyes first, so give your for-sale vehicle a gleaming, like-new wax to appeal to the masses.
How to wax a car is a little more complicated than conventional wax-on, wax-off, but it’s still a simple weekend project that contributes to proper car care.
There you have it! To call your own, a gleaming, waxed car. It may take a lot of time and effort, but it’s not something you’ll find at a car wash. For at least six months to a year, it will protect your paint and keep your investment in top shape.
If you are going to take the DMV written exam, let’s try our free DMV practice test, or download it for your IOS or Android devices to practice now!

UT Utah License Renewal: A 2024 Comprehensive Guide
Discover the ultimate guide to Utah license renewal! This comprehensive guide delves into the intricacies of renewing your driver's license in Utah,...
February 13, 2023
South Carolina S.C. Driver's License Renewal
The South Carolina S.C. driver's license renewal process is designed to be comprehensive, taking into consideration eligibility requirements, renewal methods,...
February 13, 2023

Pennsylvania PA DMV License Renewal: A 2024 Full Guide
The Pennsylvania PA DMV license renewal process is designed to be comprehensive, taking into consideration eligibility requirements, renewal methods,...
February 10, 2023