During the operating process, many car owners have inadvertently let dirt build up in the engine for a long time, causing the car to generate more and more problems and a lot of fuel. Studies have shown that the causes of engine inertia, loud noise, jerky acceleration and deceleration, and uneven running are caused by oil sludging. So how to clean sludge from the engine? Follow this article for more beneficial information!
What Is The Oil Sludge In the Engine?
Engine oils can be mineral or synthetic. It works to absorb the dirt generated during operation to protect the engine. Over time, however, it will gain saturation absorbing capacity and instead of dispersing dirt, it is deposited on the surface of the engine and in all other parts it circulates through. Instead of lubricating and reducing friction, oxidized oily sludge creates a build-up of heat in the engine. Engine oil functions as an engine coolant to a certain extent, but oxidized oily sludge plays the opposite role. You will notice that the oil pressure is dropping, and you may notice a decrease in mileage per gallon of gas.
Engine oil sludge first forms in the engine head, valve, and oil bulb. Next, it blocks the oil siphon and blocks the oil from circulating in the engine leading to multiple stroke damage. In addition to severe engine damage, it also carries the risk of damaging the vehicle’s gaskets, radiator, and cooling system. Eventually, the motor may come to a complete halt.
What Causes Engine Sludge?
Engine oils are unstable and tend to oxidize when exposed to oxygen at high temperatures. Oxidation can occur faster if the engine oil is kept hot for long periods of time. During the oxidation process, the engine oil molecules are broken and the resulting products combine with carbonaceous contaminants, metal particles, fuel, gas, water, and coolant together form a sticky slurry.
Driving in a stop-and-go state and in areas with lots of traffic lights can contribute to sludge accumulation. Frequent driving over short distances can also cause mud. Poor quality oil change routines can also make the oil susceptible to oxidation in the engine environment. Once the sludge is formed, it will move wherever the oil goes and stick to the parts. And this is where you start to see problems arise.
Engine Oil Sludge Symptoms
- Strange noises appear when starting
In fact, when the car starts to work, the oil will be pumped from the tank to the cylinder. After a period of operation, the new oil will become dirty by the temperature and friction of the parts in the car. Therefore, the car will tend to be loud and difficult to move. This means that when the car makes an annoying noise while starting, it is a signal that the oil sludging is exhausted and needs to be replaced.
- Decreased driving speed
A slow car is also a consequence of running out of engine oil. Because the friction between the piston, the ball, and the bearing is increased because the oil is not coming. Therefore, when the car shows signs of inertia, slow running, car owners should check carefully and add engine oil.
- Slow acceleration
When the engine oil turns black or runs out, the car cannot move smoothly, especially when the car is accelerating. Because at that time, the car had a high degree of inertia. Slow acceleration is also a signal reminding you that the oil tank in the car needs to be checked.
- Oil indicator light on
This can be considered one of the most obvious signs that the oil tank in the car has a certain problem. The reason is that it signals the oil pressure on the car is too low compared to the standard for the car to operate safely. Therefore, it is necessary for you to change the engine oil immediately for the purpose of avoiding any risks.
Read more >> Fluid Leaking From Car: Reasons And Methods Of Recognition
4 Steps To Recognize Engine Sludge
- Step 1: Check the indicator light
Start your car, check on the Taplo side indicator light to see if the engine and oil warning lights are on? Either of these lights is on, indicating that there is a possibility of engine oil sludge in your vehicle.
- Step 2: Observe the outside of the engine
Turn off the engine, wait for the engine compartment to cool completely, open the capo to observe the outside of the engine system to see if there is oil sludge or not?
- Step 3: Check for any oil slicks outside
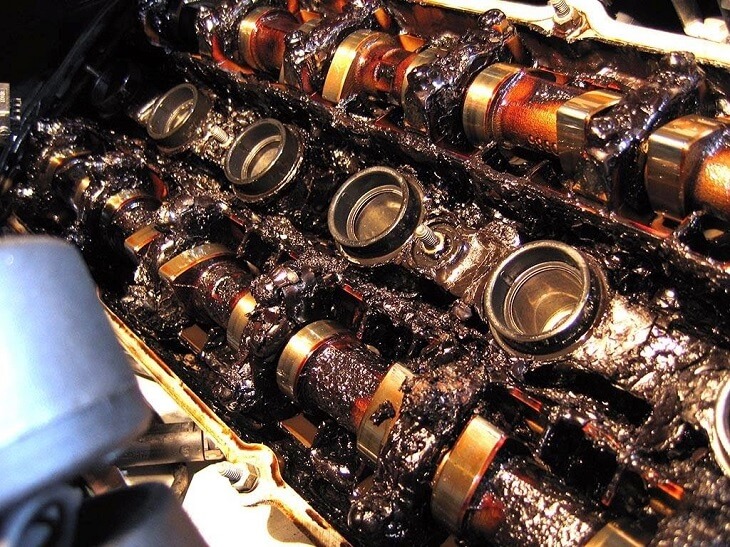
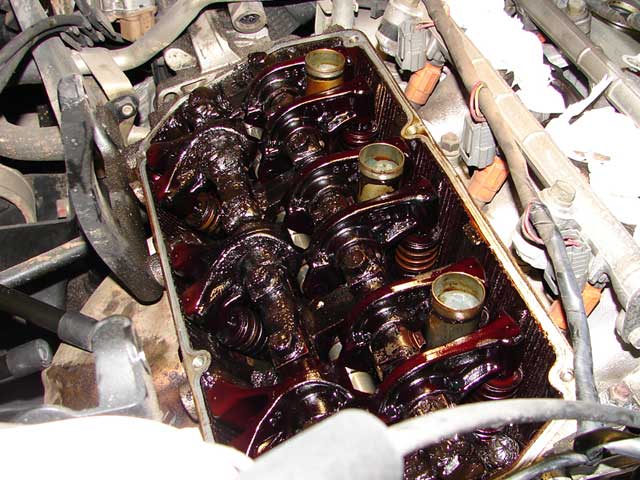
Look carefully for any oil slicks or mud stains on the outside of the engine system. Engine sludge looks like thick, dark oil and usually appears in small lumps. If you see engine deposits on the outside of your engine, you most likely have a sludge problem.
- Step 4: Check inside your oil pan
Next, take a look inside your oil pan. Remove the lid from your oil pan and look inside. You may need a flashlight to be able to see clearly. The liquid in your oil pan should be clean. Even though the walls of the greasy pan and parts will become greasy, they may still appear metallic silver underneath. Any sign of engine deposits in the oil pan is an indication of the level of dynamic sludge in your engine.
By performing these simple tests, you will be able to determine if your vehicle has engine oil sludge. If you detect any signs of engine oil sludge during the above inspection, you will need to remove it from your vehicle as soon as possible. The cost to remove engine deposits from your vehicle will depend on the severity of the problem. In the event that the engine oil sludge develops to the point where the vehicle can no longer run, the entire engine will have to be replaced. There are a few things you can do at home to avoid costly repairs due to engine oil sludge.
5 Reasons For Engine Sludge Remover
During operation, the engine parts must need a certain amount of lubricant to help the car operate more smoothly. But in the long run, the internal parts of the machine will appear dirty. Here are the reasons why you need to rinse your car engine.
- Remove accumulated dirt
The driving habits of each person will greatly affect the engine. When the vehicle is mainly used in the city for short distances, at slow speed, and often stopped because of red lights, the lubricating oil will be deposited and accumulated in the engine compartment over time. This dirt will prevent the flow of oil into the nooks and crannies in the machine. The engine rinse will remove these deposits, keeping the oil flow unblocked and every part of the engine lubricated.
- Keep the new oil clean
When draining the old oil, most of the carbon deposits, metal dust, and part of the oil will remain in the engine. Rinsing them before replacing them with new oil will ensure that these deposits do not continue to remain in the machine and cause the new replacement oil to become dirty. This is also the reason that mechanics often recommend that you always perform a lubricating oil change with an engine rinse.
- Remove oil filter residues
The oil filter will retain dirt as small as 25 microns. However, in the oil, there are particles with a smaller size than that and are not obstructed, over time they will accumulate in the engine into a sludge form that interferes with the operation of the engine parts. Even with new oil changes, they cannot dislodge these impurities and you need to use an engine cleaning solution.
- Clean mechanical parts
Excessive accumulation of dirt and mud in the engine will stick to mechanical parts, forming a sticky layer that interferes with the operation of these details. Not only that, but they also increase fuel consumption, the engine is more susceptible to corrosion and you have to spend more money to repair.
- Ensure the durability of the machine
When you just bought a used car, you will not be able to know the driving habits of the previous owner as well as whether they regularly maintain the car or not. Besides, if the car has ever had the engine removed for repair, rinsing will ensure to clean the remaining dirt in the engine and give you more peace of mind during later use.
Read more >> How To Change A Tire? A Guide For Flat Tire Changing
How To Clean Sludge From Engine?
Step 1: Protect and prepare dirty engines
- Remove debris and dirt
The first step in all jobs is to start by removing debris from the hood, grille, and vents. Debris can be grass, leaves, twigs, pine needles. You can use compressed air or just use your hands to pick up large pieces of dirt.
After the car is in operation, the engine compartment area is often very hot, the high temperature in some details can cause you to get burned. Therefore, before cleaning, it is necessary to open the bonnet for 10-20 minutes to cool down. This helps to prevent parts in the engine compartment such as valves, rubber pipes, belts, etc. from reducing their lifespan due to sudden temperature changes.
- Disconnect battery
When cleaning the engine compartment, it will be necessary to spray water directly on the engine. This can cause damage to fuses and electrical components. Therefore we should loosen the bolt on the negative terminal of the battery and slide it off the ground cable. Disconnect the anode to clean the battery outside the engine bay.
- Protect electronic components
After cleaning up any debris entering the engine compartment, you should shield and protect loose conductors and electrical components such as spark plug inlets and caps using small plastic wrap or a plastic bag. Need to cover electronic components such as generator, electronic control unit (ECU), Ballast HID (Headlight), OBD port, Air intake system (Exposure)…. Check the battery terminal cover, if it is not safe, temporarily disconnect it. Besides, it is recommended to use a clean towel or a plastic bag to cover the neck of the air inlet generator to avoid water ingress that can cause damage.
- Start the engine to warm up
After starting the engine, let it run for five minutes so that the heat generated makes it easier to remove grease or dirt.
Step 2: Degreasing
- Use engine sludge remover
Opt for a good brand of degreaser in spray bottle form. Spray it on the engine, starting from the bottom. You can also proceed to spray the cleaning solution on the areas in the engine compartment, then leave for about 3-5 minutes for the solution to dissolve, soften the dirt or grease on the parts. Currently, on the market, there are specialized solutions of Meguiars, 3M or Black Magic used to clean car engine compartments. If taking care of the car at home, car owners should equip these solutions instead of using soap or detergents that can corrode metal and rubber parts in the engine compartment.
- Pay attention to paint components
Take care that the degreaser is not sprayed onto any paint components as it may remove the paint. However, if the paint is accidentally stained with a degreaser, remove it immediately by rinsing.
- Scrub the dirt
This scrubbing step will clean more stubborn dirt and long-term deposits, grease, or burnt oil that stick on the engine. You can use a brush, mini broom combined with an engine cleaning solution to remove stubborn stains or areas with a lot of grease around the engine compartment… Always use safety goggles to protect your eyes from possible degreasers and use gloves with the necessary protective gear.
- Rinse off with clean water
After the engine compartment has been cleaned with a specialized cleaning solution, use a water jet to spray the areas around the engine compartment to clean.
Avoid using high-pressure nozzles to spray directly into the engine as this may cause disconnection of some components. The high pressure of the faucet can also cause water to pass through the plastic bag that has been wrapped to cover the electronic components or wires above. Therefore, do not use a faucet that is too strong, but only use moderate pressure to clean the dirt. If you still notice any dust or dirt after washing, reapply the degreaser and let it soak in for a few more minutes.
- Check the engine compartment
Use a soft cloth to dry the parts in the engine compartment. After completing the cleaning of the engine compartment, begin to remove the tape, the plastic wrap that has covered the electrical circuits, the engine air intake, and the generator. Check to see if there are any items left in the engine compartment, then cover the engine cover, bonnet and start the car to check if the parts are working properly.
Step 3: Cleaning special ingredients
There are a number of ingredients that you need to pay attention to for a more thorough cleaning.
- The battery
The top and bottom of the battery are easily corroded. To clean the battery terminals, remove the battery cable and use a wire brush to scrub. Alternatively, you can soak the ends of the cable in an anti-corrosion chemical such as CLR.
- Acid
If there is any corrosion caused by battery acid leaks, use a mixture of baking soda and water to neutralize them. Take a bucket of water, add a little baking soda and stir well, dip the brush in this mixture, scrub the battery terminals. You can also use them to scrub other areas where you notice any acid leaks.
- Aluminum and plastic parts
Clean the aluminum part of the engine compartment using a small wire brush and a neutralizing chemical. Scrub the plastic components and panels with a brush and then wash the surface with soapy water. You also use a plastic bristle brush with stiff teeth to scrub plastic parts like the engine cover.
- Sludge from engine
If you notice thick dirt, use a good quality brake cleaner to break down and evaporate the dirt quickly. After inserting the suction hose into the brake cleaner nozzle, point at the residue of dirt and use an extra hard toothed brush to tackle them. While cleaning your car’s engine, you may discover that the insulation of the wires is gnawed by mice or other problems. If these broken wires are connected to batteries or other electronic devices, there is a high chance of causing a short circuit with great damage. It is therefore essential that you also take precautions to protect your car’s engine.
Read more >> How to put antifreeze in the car?
How To Prevent Sludge From Engine?
- Change your oil on a regular basis
Make sure that you change your oil and oil filter on a regular basis. Most airlines recommend between 7,000 km and 10,000 km. The development of engine oil sludge is directly related to how often you change your oil. Whether you change the oil yourself or take your car to the garage, make sure your engine oil is changed according to the mileage recommended in your car’s owner’s manual. However, do not be too rigid based on the recommendations in that handbook, because the time to change the oil depends largely on the operating conditions of the vehicle as well as the usage characteristics of the driver.
- Pay attention before operating the vehicle
When starting the vehicle, check the dashboard for the check engine light and the oil change warning light. Both can indicate that the engine oil needs replacing. If the dashboard gauge shows the vehicle is heating up, check the vehicle for oily sludge.
The appearance of sludge from the engine is common, so don’t worry too much. As long as you clean sludge regularly, you will ensure your car is safe and durable. Hopefully, this topic of how to clean sludge from engines can help you in this process.
If you want to get more information about DMV Test, visit our website and take our free DMV practice test to easily pass your exam, or download it for your IOS or Android devices now!

UT Utah License Renewal: A 2024 Comprehensive Guide
Discover the ultimate guide to Utah license renewal! This comprehensive guide delves into the intricacies of renewing your driver's license in Utah,...
February 13, 2023

South Carolina S.C. Driver's License Renewal
The South Carolina S.C. driver's license renewal process is designed to be comprehensive, taking into consideration eligibility requirements, renewal methods,...
February 13, 2023

Pennsylvania PA DMV License Renewal: A 2024 Full Guide
The Pennsylvania PA DMV license renewal process is designed to be comprehensive, taking into consideration eligibility requirements, renewal methods,...
February 10, 2023